Oreo Cocoa Layer Cake
Overview
Because I love the sweet pit of baking, like everyone else, I am a baking fanatic. In addition to the lack of time, I want to make all kinds of cakes and cookies. I am busy from morning to night. Especially for me, who is a good-looking person, the beautiful ones are definitely not to be missed. Plus, if they are delicious, then it is perfect. Thousand-layer cake is a popular cake in China in recent years. It is also very simple to make. It is recommended for novices to try. If you can’t make chiffon or decorated cake, then try making thousand-layer cake. You will definitely be able to make it. If there is a difficulty with the layer cake, it should be the skin. The layer cake is actually made the same as an omelette, so if you can fry an omelette, this is really SOEasy to make!
Tags
Ingredients
Steps
-
First prepare the ingredients for the puff pastry, put the flour and cocoa powder into a dough sieve, put a layer of oil paper underneath, melt the butter in diluted water and set aside

-
Crack the eggs into a bowl, add 25 grams of fine sugar, and beat with a manual egg beater until the sugar dissolves

-
Add milk and melted butter, beat until oil and water are combined

-
Add the flour sifted twice. Sieve twice to mix the cocoa powder and flour more evenly, and to reduce particles when mixing. Sieve once on oil paper, then sift directly into a basin

-
Sift in the powder and mix well until the consistency is as shown

-
Sieve the batter to remove some small particles and bubbles to make the skin smoother. (Generally, the sieve of a soymilk machine is very useful)

-
Heat the pan over medium-low heat and use a brush to apply a thin layer of butter on the pan. Then turn down the heat to low, then scoop a ladle of batter into the middle of the pan. Pick up the pan with your left hand and spread the batter into a cake shape. It is easier to use a non-stick pan. (Especially for novices, you must use low heat to control it. If you want it to be thinner, use low heat)

-
Fry until the color of the dough changes from light to dark, the surface is delicate and shiny, and the sides of the dough are slightly raised, then it is ready to be taken out of the pan. When taking it out of the pan, lift the surface with your hands, and then gently scoop it up with a shovel. If it is too thin, it will break easily. Also, don't over-fry it when frying, as it will easily break and lose elasticity. After the pancake skin is fried, place it on a plate and set aside. (You can also fry the cake skin on both sides. Once one side is fried, flip and fry for a few seconds. It depends on your personal preference. If you are making pancakes, only fry one side.)

-
Scrape off the center of Oreo cookies

-
Put the scraped biscuits into a bag and use a rolling pin to crush them into pieces for later use. It is best to use a thicker bag to hold biscuits, or a thick piping bag. I used a ziplock bag here

-
Use a round mold to press out uniformly sized round dough and set aside. (I fried the dough on both sides, so the surface is not so smooth. This round mold is about 5 inches in size)

-
Beat 300g whipping cream and 30g caster sugar until it has obvious textures as shown

-
Place a piece of dough on the decorating turntable, then spread a layer of cream, then sprinkle with crushed Oreo cookies, and finish the crust in this order. You can sprinkle as many biscuit crumbs as you like, but don’t spread it too full, otherwise the next crust will not stick firmly, and the remaining butter will act as a glue

-
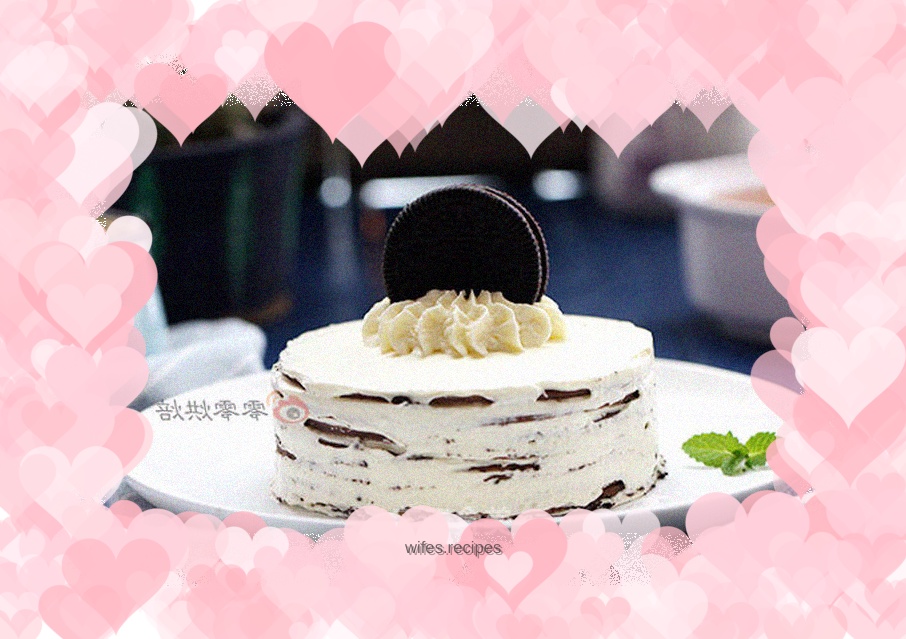
After smoothing the cream on the last layer, use a spatula to smooth off the excess cream around it. Just smooth it out a little. What you want is to be able to see the black and white feeling. Of course, if you like the feeling of a naked cake, you can leave it alone, so this kind of cake does not require decorating technology.

-
Add some butter into a piping bag equipped with a piping tip

-
Pipe a flower on top of the cake, then insert an Oreo cookie and you're done
