High-looking steamed cake that won’t collapse or collapse
Overview
Why do we make our own cakes? Someone said, the cakes outside are so beautiful and cheap. As everyone knows, your heart will sink when you know that there are many baking additives in it, including various cake oils, grandma powder improvers, and flavoring and thickening agents. Urban reporters often make unannounced visits to certain cake shops. The ingredients for cakes worth tens of dollars each include eggs, wheat flour, white sugar, refined vegetable oil, and edible spices. In addition to eggs, wheat flour, white sugar, refined vegetable oil, and edible spices, it also contains various additives. It often emits a strong flavor, which really worries the health of children in the future, because most of them like to eat it. Now that I cook it healthily, the question comes again. My friends often ask me, should I buy an oven? Will I regret buying it? What kind of suitable one should I buy? What should I do if I don’t know how to use it? It is indeed a problem, but nothing can trouble foodies. We also have a steamer! It can be steamed! Entrusted by several friends to make a practical steamed cake, I tried this recipe many times and succeeded every time. In addition, the technique of this recipe is based on the chiffon cake method, which is a common birthday cake embryo. Once it is ready, you can decorate it with cream and put fruit decorations on it, and dress it up into your favorite cake style to make your family happy. This steamed cake can also be a starting point for your baking journey. If it succeeds, you can safely buy an oven and toss it. If it fails, then the baking journey will be a bit difficult in the future. However, if you read the step-by-step diagram carefully and pay attention to every detail, I believe you will get better and better at making this cake. Be sure to read the tips in particular
Tags
Ingredients
Steps
-
Separate the egg yolk and egg white. The egg yolk must not be mixed with the egg white, otherwise it will affect the whipping. The egg white must be frozen in the freezer of the refrigerator. A layer of ice will form on the surface when it is taken out later

-
Add sugar to the egg yolks. You can beat it with a manual egg beater or use an electric egg beater. It turns out that it doesn't matter. As long as you don't over-beat, the egg yolks and sugar must be fully integrated

-
Add oil and beat evenly until the egg yolk and oil are fully emulsified. No oil spots can be seen on the surface. The emulsification process is also very important

-
Add milk and mix well

-
Sift the low-gluten flour into the egg yolk paste

-
Use a spatula to stir gently up and down until the mixed egg yolk batter is fine and smooth. If there is graininess, it will affect the finished cake. Do not over mix to prevent the batter from becoming glutenous, which will also affect the cake. If the batter is not delicate enough, you can sift it

-
Take the egg whites out of the refrigerator. A layer of ice residue on the surface is best. Add the white sugar to the egg whites in three batches. Beat the egg whites with an electric egg beater until the bubbles are as shown in the picture. Then add 10 grams of white sugar for the first time and continue beating with an electric egg beater. I won’t mention it later. All are done with an electric egg beater

-
When tiny bubbles appear, add 10 grams of sugar

-
When more delicate bubbles appear in the picture, add another 10 grams of sugar

-
Use low speed, which is low speed, and beat until the dry foam state is shown in the picture

-
Even if the egg whites are turned upside down in the bowl, they won’t fall out

-
Take one-third of the egg whites and add it to the egg yolk paste. Use a rubber spatula to gently stir it up and down. Do not stir like mud

-
Mix until it is so delicate and soft

-
Continue to add the egg whites to the egg yolk paste in two batches, using the same mixing technique, gently stir up and down evenly to prevent defoaming, and the technique should be gentle

-
Pour the mixed cake batter into a six-inch removable bottom mold, then gently shake it down from a height of 20 cm to knock out the gas inside, and then cover it with a layer of plastic wrap

-
Wait for the water to boil, then put the mold into the steamer. If there is no plastic wrap, just use a plate to cover it. Do not let the water vapor wet the cake. I did not take a photo at this step. Steam over low heat for 40 minutes. After steaming, remove the plastic wrap, tap a few times to knock out the moisture, and then turn the cake upside down on a cooling rack

-
Wait until the cake has cooled completely before unmoulding

-
Be sure to wait for complete cooling before demolding

-
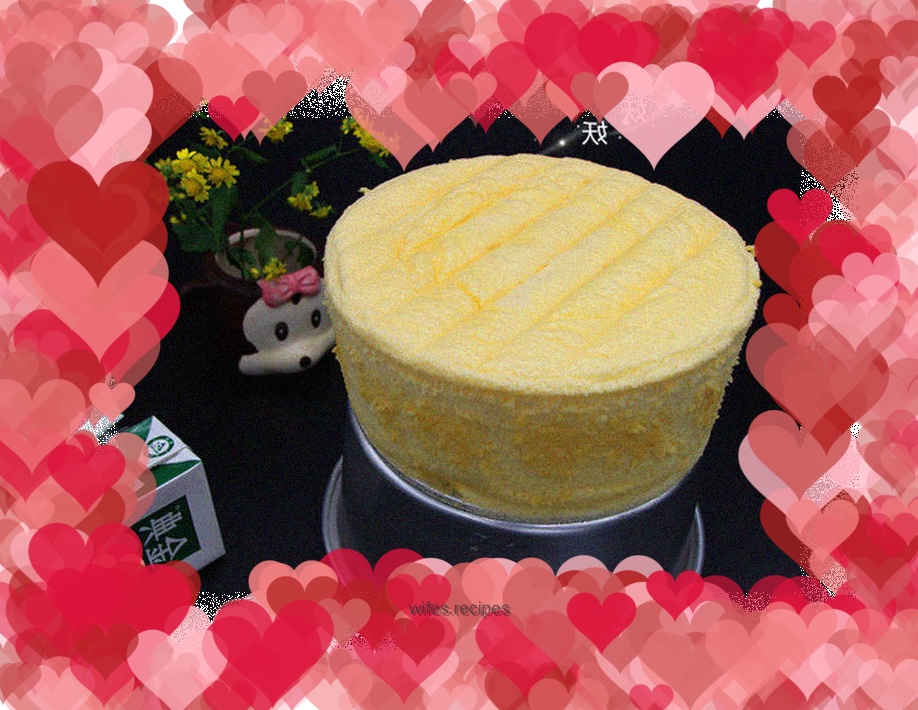
Finished product

-
Finished product

-
Finished product

-
Finished product

-
Finished product
