Little Princess Bubble Bath Birthday Cake
Overview
This little princess bubble bath birthday cake was specially prepared for my sweet girl’s 4th birthday. Every baby's birthday, the cake must be made by the mother herself, and it also embodies all the mother's love and best wishes for her child! Love you baby!
Tags
Ingredients
Steps
-
Use an egg separator to separate the egg yolks from the egg whites.

-
Squeeze a few drops of lemon juice into the separated egg whites and refrigerate.

-
Place the separated egg yolks in a large basin without water or oil.

-
Add sugar to the egg yolks and mix evenly with an electric mixer at low speed.

-
Add salad oil to the egg yolks and stir evenly with an electric whisk to fully dissolve the oil and water.

-
Add milk and continue mixing evenly.

-
Sift the low-gluten flour into the egg yolk liquid.

-
Use a rubber spatula to cut into a smooth batter without any lumps.

-
Beat the refrigerated egg whites in a large bowl and add the sugar in three batches. When big foam forms, add sugar for the first time.

-
When the texture appears, add sugar for the second time.

-
When the texture is clearer and the egg beater feels blocked, add sugar for the third time.

-
When the egg beater is lifted up and can pull out small sharp corners without bending, the whipping is complete.

-
Add one-third of the egg whites into the batter and mix evenly.

-
Pour the mixed batter into the remaining egg whites and continue to mix evenly.

-
Put the mixed batter into an eight-inch baking pan and shake it a few times to remove any air bubbles inside.

-
Place in a preheated oven at 120 degrees above and 100 degrees below, and bake for 80 minutes.

-
Baked cake.

-
Whip whipped cream. Put the cream in the refrigerator for 24 hours in advance, take it out and pour it into a clean, water-free container. Add white sugar, because light cream does not contain sugar. Usually I will add 30 grams of sugar to 250ml of light cream. I personally like it light. It depends on personal taste. Use an electric egg beater to beat the sugar evenly at low speed for about a few dozen seconds. Turn the egg beater to high speed and beat until clear lines can be seen. When the egg beater is lifted up, strong corners can be pulled out. At this time, the cream is delicate and smooth, and the whipping is completed.

-
Cut the cake into two pieces, place one piece on the cake tray, put them together on the decorating turntable, and add your favorite fruits.

-
Spread a layer of cream over the fruit and top with another slice of cake.

-
Spread the cream on the surface and complete.

-
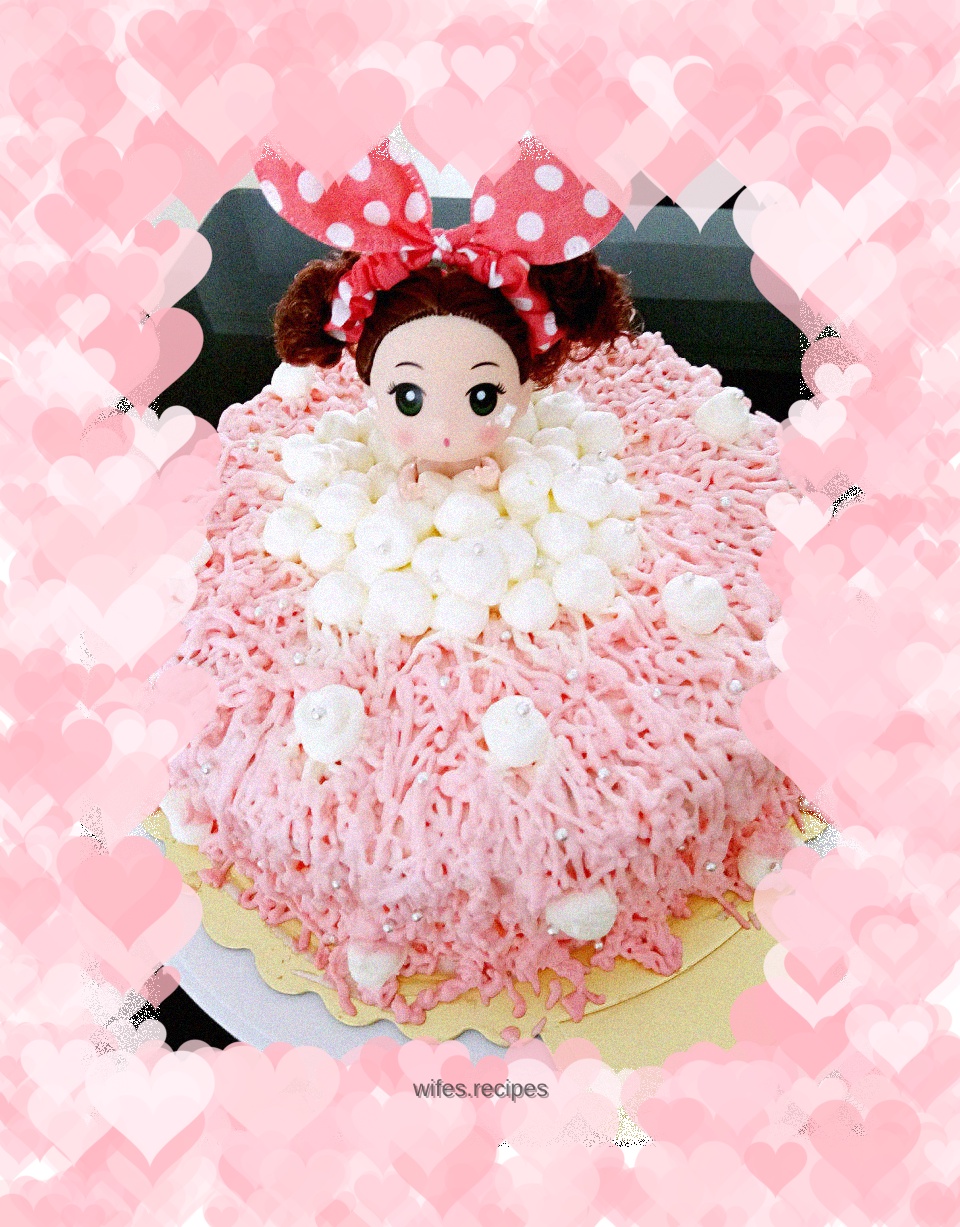
Make a hole in the middle of the cake and put the doll inside. Take a portion of the cream, drop a few drops of pink coloring, put it in a piping bag, cut a small opening with scissors, squeeze out slender threads on the cake to cover the entire cake, then put the white cream into the piping bag, squeeze out larger bubbles, and finally sprinkle with beautiful sugar beads to complete.

-
Finished product picture.

-
Finished product picture.
