princess or queen
Overview
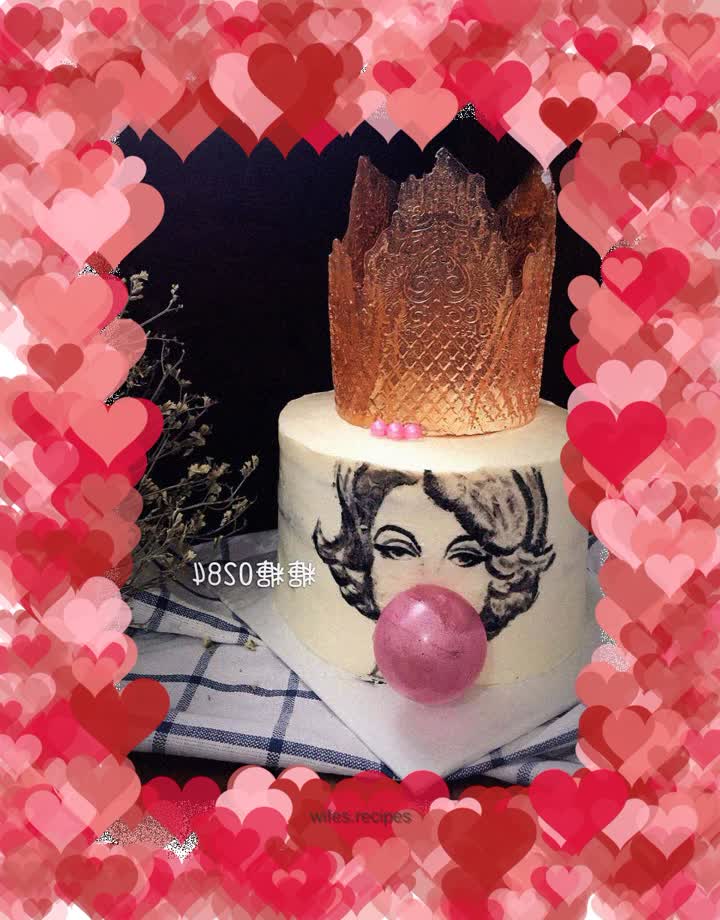
Is it a princess? Is it the queen? Coffee or chocolate? There must be a queen and a princess living in your heart... She can be so powerful that she is omnipotent, domineering but reasonable. She likes astringent coffee, which is bitter and fragrant, and is the taste of life... She can be shy and cute, blowing bubble gum and hugging dolls... She likes sweet chocolate, silky and sweet, which is a memory of childhood...
Tags
Ingredients
Steps
-
Prepare 2 6-inch chiffon cake bases (recipes have been distributed before)

-
Add the light cream to the caster sugar and beat until 7 points, then add the slightly cooled ganache and continue to beat (the light cream and chocolate are melted and mixed with warm water)

-
One layer of cake base, one layer of chocolate cream

-
Since I am making a chiffon cake base, the load-bearing capacity is not strong, so I need to pile it up. That is, when I get the fifth piece of cake base, insert paper sticks (the kind of paper sticks used for lollipops) in three places... until all 6 cake bases and 5 layers of chocolate cream are done, put them in the refrigerator for later use

-
To make cream frosting, directly mix the cream frosting ingredients and beat them. There will be residue at the beginning. Don’t be afraid. Just add warm water and continue beating until smooth and smooth

-
If there are any residue in the buttercream, continue to beat it with warm water. If the weather is too hot, put it in the freezer

-
Cream frosting is used to smear the cake. Since it takes a long time to paint, it can only be smeared with butter cream. The delicate light cream cannot bear to be exposed to the outside for such a long time...

-
Prepare painting tools. Since you need to draw on glutinous rice paper, but glutinous rice paper melts when wet, I use powder mixed with butter to mix colors. This time I used natural bamboo charcoal powder, cocoa powder and red yeast powder...

-
Outline the approximate shape on the glutinous rice paper, cut it out to the basic size, and stick it on the cake (if the cutting is not good, please give it a try)

-
Use dark bamboo charcoal powder to outline simple outlines

-
Because the powder mixed with butter is used, the drawing on the glutinous rice paper will not be good. You can wipe it off gently with a paper towel...but you cannot wipe it too hard or on a large area, so you have to be careful when writing

-
Mix some butter with red yeast powder and cocoa powder, add the details, then draw it and put it in the refrigerator for later use

-
Blend dragon fruit into puree, then filter out the juice

-
Add coral candy to dragon juice and heat over low heat

-
Keep stirring until all the coral candy melts and bubbles, continue heating for about 2 minutes, remove from heat

-
Blow up a small balloon, find something to fix it in place, and pour the coral syrup onto the balloon as soon as the bubbles reduce

-
Wrap the balloon in all directions with coral syrup and let it cool. After setting, insert a hole in the tail of the balloon to deflate it. Take away the balloon and it will become a pink candy glass cover

-
Continue to heat the coral syrup. As the dragon fruit is boiled for a long time, the color will change. If you want to make an orange-yellow crown, the syrup should be boiled for a longer time... (Actually, I made this crown several times but couldn't get a satisfactory result, so I boiled the syrup several times... If it doesn't work, break it into pieces and put it in the pot again... Hahaha!)

-
Coral sugar has a strong coagulation force, so it needs to be fast. Pour the syrup on the mold, cover it with a piece of oil paper, and roll it out with a rolling pin. Don’t roll it out too much... Just cover the mold well

-
Find a tool of suitable size and round it against the mold

-
Roll into a round shape and secure, wait for cooling

-
Unmold the crown, place it on the cake, and insert the candy glass cover into the mouth (it’s best to insert 2 toothpicks to fix the position!

-
Finished product

-
Finished product

-
Finished product

-
Finished product
