Rice cooker two-color cake roll—for those who don’t have an oven and want to DIY
Overview
I really love cakes, but I have never dared to buy an oven to go home~~The project is too big and too deep, is there any~~I am not mentally prepared yet, so I searched for rice cooker cakes, referenced various versions, and practiced. I found that the doll's rice cooker cake version is very suitable for us novices who do not have accurate measuring tools. The measuring tool is very simple, which is an ordinary spoon. If the egg whites are beaten well, it will be 100% successful. So the basic cake body of this two-color cake roll is made according to her recipe. Here I will take photos and explain in detail step by step. If you are not clear about it, you can check out the recipe for the doll. If everyone understands how to make the cake, please skip it directly. Hehe, I hope to share it with more friends. I remember how eager I was to know the detailed process! I have made the basic cake many times, and suddenly I thought, can I roll a cake roll myself? So I tried it and found that it can be done. I was so happy! I really like to mess around~ But if you make it yourself, you can eat it with peace of mind, especially if you have children at home. The various additives bought from outside are scary just thinking about it. So, those who are not afraid of trouble and love to make troubles, let’s take action!
Tags
Ingredients
Steps
-
Separate egg whites and yolks. I still use this method easily, cracking a small hole in the egg shell

-
Prepare a clean container that is oil-free and water-free (this must be oil-free and water-free, as a little water can prevent the egg whites from beating). Put the holed end of the egg downward, pour out the egg white, and shake it gently, but not too much. Be careful not to break the egg yolk, and be patient. Put the egg yolks into another clean container and separate all 4 eggs

-
Add a spoonful of sugar to the egg yolks and mix well until the sugar melts. It is easier to mix with soft sugar

-
Add 6 spoons of milk and mix well

-
Add three tablespoons of cooking oil and mix well (the original recipe is corn oil, but I always use arowana blended oil)

-
Sift in 3 tablespoons of flour, a little salt, and mix well. Note that the amount of flour here is 3 tablespoons, and it needs to be sifted in with a tool such as a mesh colander, so that the flour is not easy to clump and is more delicate. Also, the original recipe added a little baking powder in this step, but I didn’t. For children’s food, try to add as little baking powder as possible

-
Mix the egg yolk paste and set aside

-
Beat the egg whites until they have fish-eye bubbles, add a spoonful of white sugar (I used to make it too sweet according to the amount of white sugar in the original recipe, so I only scored 7.8 points for a spoonful of white sugar here), a little salt, a drop of white vinegar, and then continue to beat

-
Beat the egg whites until they are thicker, then add a spoonful of sugar and continue beating

-
Beat for a while longer, until the egg whites are stirred up by the egg beater and a small upright triangle appears, and the egg whites are ready to be beaten even if they are turned upside down. We can’t continue to fight here. Once we fight, it won’t be easy

-
Pour one-third of the beaten egg whites into the egg yolk batter and mix well. Here you need to cut and mix, flip it up, down, left and right, but don't make circles, the bubbles will disappear if you make circles

-
After stirring evenly, add one-third of the egg whites and stir evenly

-
Pour the evenly mixed egg batter into the remaining egg whites and mix evenly

-
Mixed egg batter, set aside

-
Wash and dry the rice cooker, apply a thin layer of oil, cover the lid, and press the cook button. After a while, it will automatically jump to the keep warm button, and the rice cooker will be preheated

-
Pour the egg batter into the preheated rice cooker, use a rag to place your hands, pick up the rice cooker's inner pot and weigh it a few times to remove any larger air bubbles, and use a spatula to smooth the surface slightly

-
Cover the lid, press the cook button, and it will jump to keep warm after a while (my rice cooker jumps in less than two minutes). At this time, cover the vent with a clean cloth, let it simmer for 20 minutes, then press the cook button again, jump to keep warm, and then cover it with a towel for 20 minutes. That's it

-
When stewing, you can prepare a spoonful of salad dressing and mix it with the meat floss to form a meat floss salad dressing (I use homemade vegetarian meat floss, you can feel free to use whatever fillings you want)

-
This is what it looks like after it's cooked. Usually it is done at this time. If you are not sure, you can use a dry toothpick to insert into the cake. It will be good if there are no fine crumbs on it when you pull it out

-
Use a toothpick to score a circle around the edge of the cake inside the rice cooker, place it upside down on the paved table, and unmold it (it would be better if you have better props, but unfortunately I can only wipe the table clean and cover it with plastic wrap)

-
Use a knife to cut from the middle of the side of the cake into two cake slices

-
Use a knife to remove the four sides of the cake slice and make it into a square shape

-
Spread the meat floss salad dressing on the cut side and slowly roll it up with the plastic wrap. After rolling, pick it up with the plastic wrap and twist both ends

-
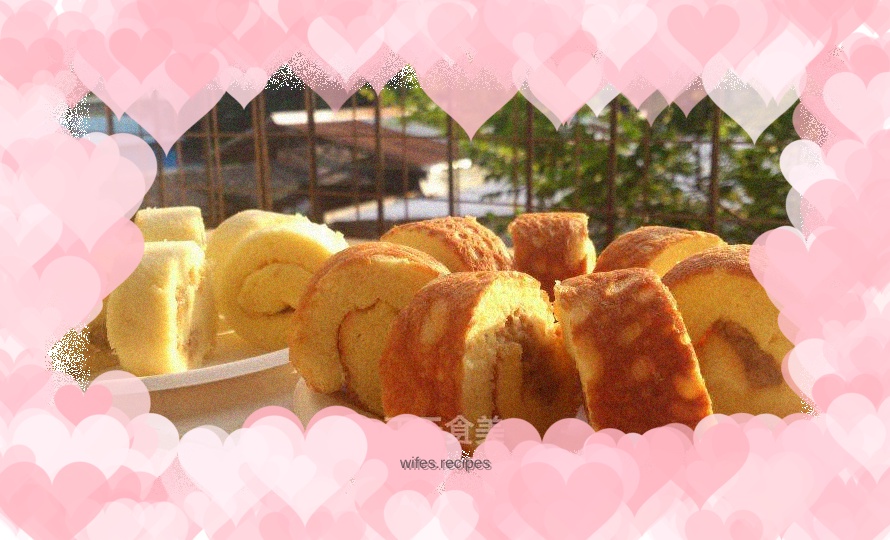
Use the same method to roll up and wrap the other piece of cake, and put it in the refrigerator safe to set, about an hour. Because the cake base is baked at the bottom of the pan, it is dark in color and a little crispy. When rolled up, it becomes a dark roll. The cake surface is on top and rolled up into a white roll

-
After characterization, take it out of the refrigerator

-
Slice, plate, and serve. Be careful not to flatten when slicing

-
Isn’t it beautiful?
