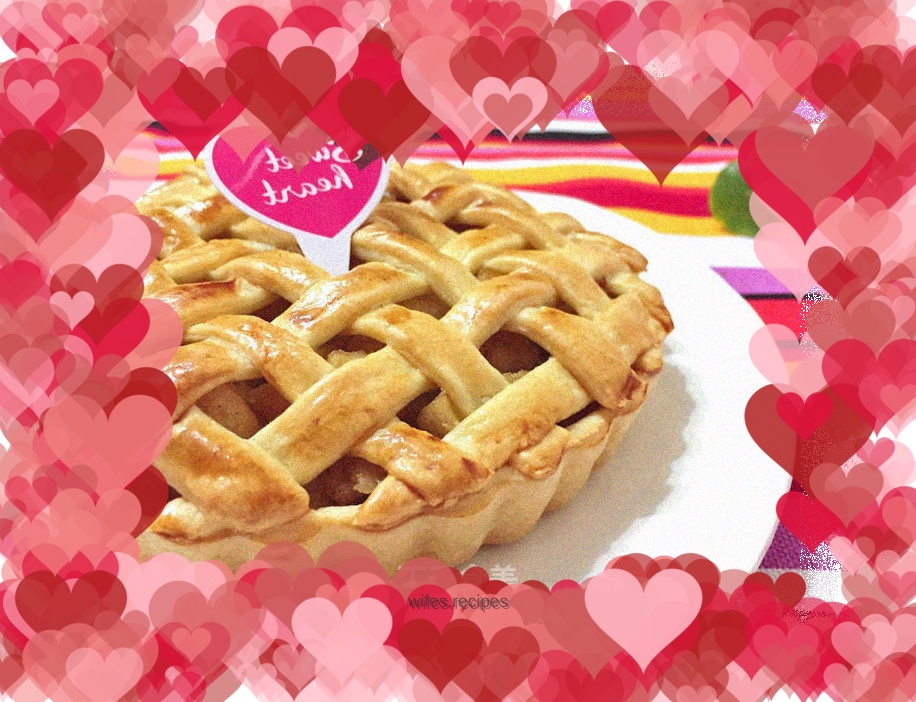
Braided Apple Pie
Overview
Pie is a joyful dessert. It was originally a food that originated in eastern Europe, but now it can be called a typical American food. Apple pies come in all different shapes, sizes and flavors. What we are making today is weaving a grid apple pie, making people happy not only eating it, but also looking at it. The steps include specific methods for weaving the grid pie crust. Reference size: one serving on a 6-inch pie plate.
Tags
Ingredients
Steps
-
First make the pie crust. Because the pie crust needs to rest for several hours, it can be made in advance. Cut 60g butter into small pieces and soften at room temperature.

-
Pour 150g low-gluten flour and 10g sugar into the softened butter.

-
Knead continuously with your hands until everything turns into coarse sand-like particles.

-
Add water. Add as appropriate according to the state of the dough.

-
Knead into a slightly smooth dough. Don't knead for too long to avoid tendons.

-
Wrap the kneaded dough in plastic wrap and place it in the refrigerator to rest for 2 hours. The minimum is 1 hour.

-
Then make the pie filling. Peel the apples and cut into small pieces, about 260g.

-
Put 10g of butter in the pot and heat over low heat to melt.

-
Pour in the diced apples and stir-fry over low heat.

-
Stir-fry briefly and then add 45g of fine sugar and continue to stir-fry.

-
After adding the sugar, the apples will soon exude a lot of water. Continue to stir-fry and let the water cook and soften the apples.

-
Mix 10g of cornstarch with 20g of water and add to the soft boiled diced apples.

-
Continue to stir-fry until the diced apples become thick.

-
Turn off the heat and add 1/4 tsp salt and 1/4 tsp cinnamon. Stir fry evenly.

-
The pie filling is ready, take it out of the pan and let cool and set aside.

-
Dust a cutting board with light flour, take out the relaxed pie dough and place it on it.

-
Divide the dough into two parts with a weight ratio of 2:1. Start by rolling out the larger portion into a sheet slightly larger than the pie plate.

-
Place the dough sheet on the pie plate and press it gently with your hands to make it fit the pie plate and form the base of the pie.

-
Use a rolling pin to make a circle on the pie plate.

-
Remove any excess dough around it.

-
Use a fork to prick holes evenly in the pie base to prevent it from puffing up during baking.

-
Roll out the other smaller piece of dough into thin slices as well.

-
Use a ruler or other tool to cut it into long, even strips with a roller or knife according to the width you like.

-
Fill the pie plate with the previously made pie filling, piling it slightly high in the middle.

-
Next start weaving the pie crust. It seems troublesome, but it is actually very simple once you master the method. The first step is to lay out the vertical bars.

-
Turn the pie crust over every other strip and place the first horizontal strip on top.

-
Turn the pie crust back over and press the first horizontal strip.

-
Then flip up the vertical bar that is pressed down by the horizontal bar and put on the second horizontal bar.

-
Turn the upturned vertical strip back and press the second horizontal strip.

-
By analogy, turn it up and place horizontal bars.

-
Turn it down and hold it down.

-
Braid until the entire pie crust is completed. At this time preheat the oven to 200 degrees.

-
Use your fingers to press the junction between the pie crust and the pie plate to remove excess pie crust around it.

-
Brush a layer of egg wash on the surface of the pie crust.

-
Place in the oven, middle layer, bake at 200 degrees for 15 minutes, then at 175 degrees for 25 minutes. Bake until the surface is golden brown. If the color is too dark, cover it with tin foil.

-
Done. The golden apple pie is very appetizing, isn’t it?
