DIY sponge decorated cake cup (entry level)
Overview
On the weekend afternoon, I started baking at home with my baby, smelling the smell of cake, it was so enjoyable! The cake was very well made. I am a novice in decorating, but my baby encouraged me and said: Mom, decorating is just graffiti. We can do whatever we want. No matter what it is, I like it because it is the result of our labor! I'm so touched! Friends, buy an oven, a set of baking tools, and start baking. Not only can you eat food with confidence, but it is also a lot of fun. The most important thing is: I make the decisions when baking. I can decorate the flowers however I like, and design whatever patterns I like... Haha, so capricious! ! !
Tags
Ingredients
Steps
-
These are the ingredients needed to make cake cups (corn oil and milk can be put in one vessel)

-
Sift the cake flour twice first and set aside

-
Mix corn oil and milk with chopsticks and set aside

-
Crack the eggs into a larger vessel without water or oil

-
Pour in the soft sugar and beat with an electric mixer at low speed

-
Beat until many fish-eye bubbles appear, squeeze in a few drops of lemon juice

-
Then beat at medium speed until a toothpick can be inserted and the toothpick can stand upright without falling over, or lift the egg beater head and the egg batter will not disappear easily (at this time, you can preheat the oven to 150 degrees for 5 minutes)

-
Sift in the flour in two batches, stirring from bottom to top each time, and stir evenly each time

-
Pour in the mixture of milk and corn oil, and mix while pouring. Be sure to mix evenly. The successful batter will be very delicate and light. (Be sure to pay attention to the technique when mixing, speed up, and move lightly to avoid defoaming and gluten-glutening of the batter. The gluten-rich cake will have a hard texture)

-
Pour the cake batter into a paper cup of equal size, fill it 80% full, shake it a few times, put it in the preheated oven, place the middle layer, and heat it up and down to 150 degrees for 25 minutes

-
The cake is slowly growing taller, which is why it was only 8% full just now

-
After baking, take it out to cool down before decorating

-
A successful cake cup has good color and does not crack

-
Take out the refrigerated whipping cream and prepare whipped cream (the choice is tower whipping cream)

-
Prepare ice water

-
Take a water-free and oil-free basin and place it on the ice water, pour in the weighed cream and sugar

-
Beat with electric egg beater at low speed

-
Beat at low speed until the texture is clear, that is, turn the bowl upside down and the cream will not fall. Place it in the refrigerator for a while

-
Prepare small eight teeth and braided flower basket decorating head

-
Put the piping bag on the cup to make it easier to put the cream

-
Take out the cream from the refrigerator, divide out one third of the cream and add a little red food coloring to make it pink

-
Take a cake cup, use a silicone spatula to take an appropriate amount of white cream and spread it evenly on the surface

-
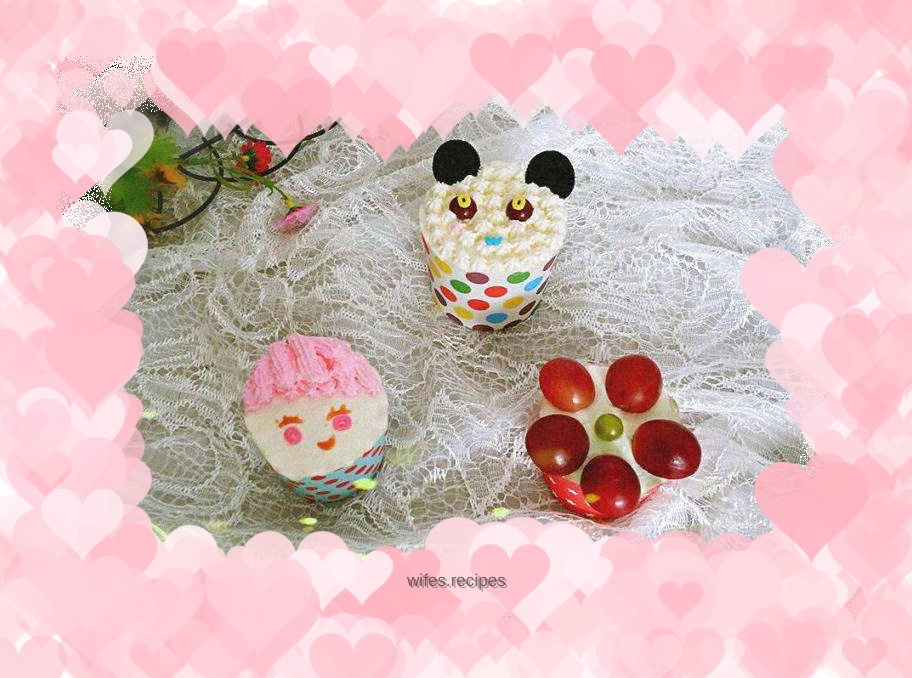
Take pink cream and use small eight teeth to frame the doll's hair. Use the letter o decorative piece to make the eyes. Use a little tomato sauce to draw the eyebrows and mouth

-
Patterns made with braided basket teeth

-
My baby’s cake cup is designed with red grapes

-
Just move a few letters, baby Niu Niu insists on letting me take a picture

-
I made this with my baby. He donated two pieces of his cookies to make the ears for the panda, and I used rainbow candies and letter pieces to make the eyes and mouth

-
A very happy parent-child activity, my baby said we would like to bake together next weekend

-
Autumn whispers, haha
