Matcha ice cream
Overview
All those who think ice cream machines are useless and replaceable are because they are not! Yes! Make! Use it! ! ! The ice cream machine is simply a magical item ~ a must-have for summer! It’s not expensive anyway! The recipe contains many pictures, please proceed with caution
Tags
Ingredients
Steps
-
Prepare materials and complete weighing

-
Egg yolk + white sugar 1, mix and beat thoroughly until the volume becomes larger and the color becomes lighter

-
Milk + salt + white sugar 2, mix, cook over medium-low heat until it boils slightly (small bubbles are enough)

-
Slowly add the boiled milk in step ③ to the egg yolk in step ②, and stir quickly while adding it. After finishing, the custard will have rich foam

-
Let the liquid in step ④ cool down slightly. It is normal for the liquid to defoam during this period. The temperature of freshly brewed custard is close to 60°C, and it is easy to overcook it if heated directly.

-
Return the slightly cooled custard in step 4 to the pot, cook over low heat, and stir constantly. Judgment basis: If you have a thermometer: cook until the liquid is between 75 and 78°C; if you don’t have a thermometer: cook slowly until the foam gradually disappears, the liquid thickens and becomes sticky, and there are obvious marks when you rub it with your fingers.

-
Take 5 small spoons of thin tea, about 25ml

-
Add 5 teaspoons of boiling water, about 25ml. Stir evenly without any particles. (It is recommended to use egg whipping. I tried it with chopsticks, but it was too tiring and ineffective)

-
Add step ⑧ to the cream and mix it casually until there are no big lumps

-
Sieve the heated custard in step 6, add it to the cream, and mix it casually until there are no big lumps

-
Use egg beater and stir quickly for a while to mix the matcha particles evenly. Don't over mix, and don't whip the cream!

-
Place in the refrigerator and refrigerate for 12 to 24 hours. To stabilize and mature the ice cream liquid (make the oil and moisture evenly distributed), friends who have ice cream buckets can also start freezing the buckets.

-
The ice cream liquid after being left to mature: obviously thickened, with traces of dripping

-
Prepare the ice cream machine, assemble it, turn on the power, and start empty mixing

-
Slowly pour the ice cream liquid into the idle ice cream machine. It is obvious that the ice cream liquid at this time has reached the general height of the barrel (you can see the paddles in the middle layer)

-
After stirring at room temperature for 5 minutes, the liquid began to freeze and form, but the volume did not change significantly (the room temperature here is about 26°C, which is a bit high)

-
Continue stirring at room temperature. After about 10 minutes, you can see that the ice cream gradually begins to stop sticking to the wall of the bucket and the volume of the ice cream increases significantly

-
After 15 minutes, the ice cream has nearly doubled in volume, has an obvious thickness, and does not stick to the wall of the bucket, which means the ice cream is ready

-
Take it out and take a look. It is obvious that this state cannot be achieved without a machine. The ice cream at this time can be shaped like commercially available ice cream cones and sundae cups and has a soft and smooth texture. If it needs to be harder, you can put it in the refrigerator for a while.

-
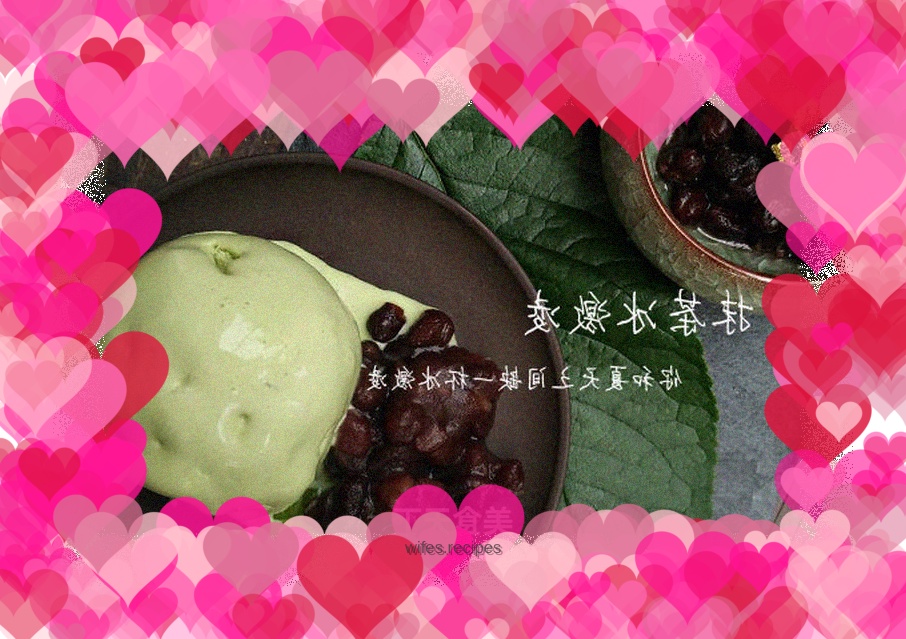
This ball is scooped out directly for freezing. The surface is easy to melt, but the inside is still very firm~ Matcha with red beans, perfect~

-
By the way: I would like to share the wonderful use of vanilla peel. Many people like to make vanilla candy, but it is very luxurious and expensive. Leave the peel to soak in wine. Any white wine will do, as long as it is above 30 degrees, such as vodka or rum. Generally, the color of newly soaked water is darker than mine. Anyway, if you make a thicker one, pour less, and if you make a lighter one, pour more. Versatile, can be used with almost all Western pastries, the last added
