Gradient Cream Decorated Cake
Overview
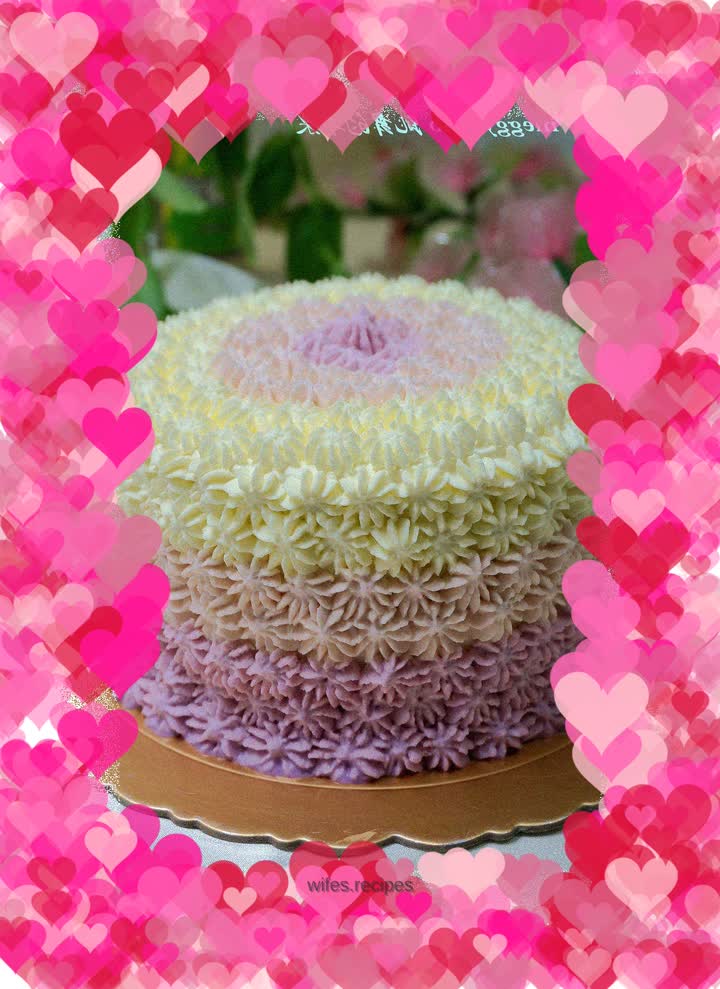
Today I made another fresh and fresh cream-decorated cake. The gradient color method is used, which is a wasteful purple color. It is beautiful for personal use or as a gift. There is no complicated decorating technique, just use the most common 10-petal flower decorating tip. Cream whipping is very important. The cream for the inner surface can be beaten to 9 parts, so that when mixed with the diced fruits, it can play a strong supporting role; the external surface does not need to be 100% smooth, because it needs to be decorated on the outside, which can cover up the ugliness; it is best to beat the cream for the decoration to 7 parts. If it is too hard, the flowers will not be delicate and have large air bubbles. If possible, it is best to use three basins to whip the three colors of cream separately, so that the texture of the framed flowers is basically the same. Decorating flowers seems very simple, but the more I do it, the more I discover that there are many ways to do it. I will continue to practice more. In winter, if there is heating in the house, the room temperature is still quite high. It is recommended to beat the cream as you use it. Do not whip it all at once, otherwise the hot air will cause you to have a little bit of it!
Tags
Ingredients
Steps
-
Separate the egg white and egg yolk, and put the egg white into a basin without oil and water

-
After beating the egg yolks, add 20 grams of sugar and mix evenly

-
Add 50 grams of corn oil and stir evenly

-
Add 50 grams of milk and mix well

-
Sift in cake flour

-
Mix evenly, no dry powder particles

-
Use an electric egg beater to beat the egg whites, and add the sugar to the egg whites in three times. When making big bubbles, when making white and fine texture, and when making texture, adjust the speed from low to high

-
Lift the egg beater until the egg whites are short and pointed; now you can start preheating the oven to 140 degrees

-
Mix the egg white paste and egg yolk paste three times. Stir thoroughly each time before adding the next egg white paste. Use a bottom-up mixing technique. Do not use a spatula to draw circles in the basin, as this will cause serious defoaming of the egg whites

-
After mixing evenly, it will be a fine and smooth cake batter

-
Pour the cake batter into two 6-inch molds and shake them twice to release big bubbles

-
Put into the preheated oven, middle layer, heat up and down to 140 degrees, 40 degrees

-
Take it out of the oven, shake it twice to remove excess heat, then place it upside down on a drying rack, let it cool completely before unmoulding

-
Demold successful

-
Cut each cake into two slices crosswise. Only 3 slices are actually used because after adding the fruit filling and cream, it will be very tall. Two slices are a bit short, four slices are too tall, and three slices are just right

-
Cut the cantaloupe into small cubes and set aside

-
The cream and sugar for filling and spreading are ready

-
The cream is whipped

-
Take a piece of cake and place it on the cake tray. Complete the filling with a layer of cream, a layer of fruit and a layer of cream

-
After covering with a piece of cake, make the filling as above

-
Cover with the third piece of cake, and then smooth the whole surface. Don’t make it 100% smooth. You will also need to decorate it later, which can just cover up the ugliness

-
Whip new cream, choose your favorite flower tip and decorate it with white cream flowers

-
Add purple food coloring, then decorate the surrounding and top with lavender butter flowers

-
Add another drop of purple coloring to the light cream and decorate the remaining cake. Voila, a gradient cream decorated cake is completed. I really like it, and it’s quite honorable to give it away!
