One Piece Chopper Chiffon Cake Roll
Overview
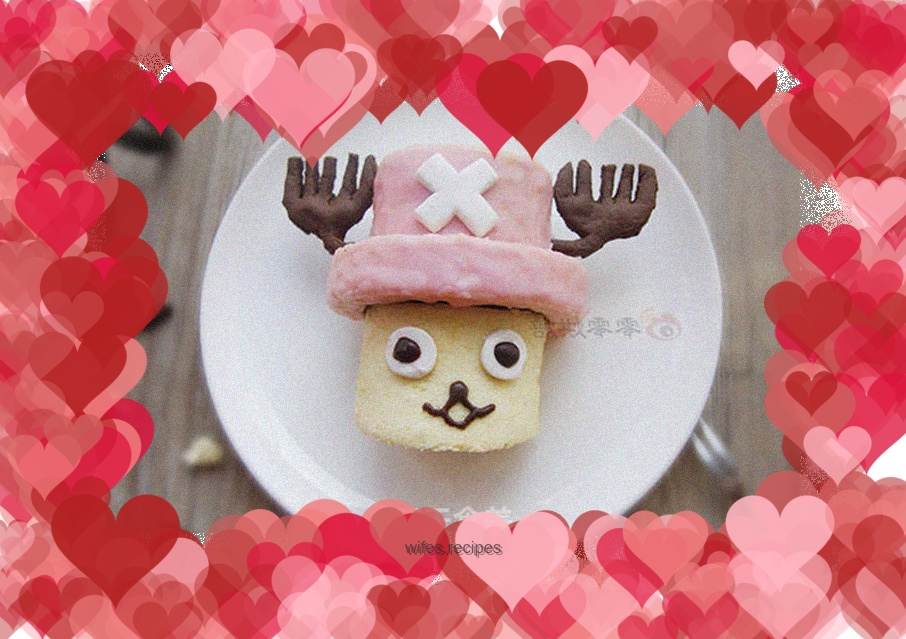
One Piece Chopper Cake Roll, the cute shape feels cute, it’s not easy being a mother, I spent the whole afternoon just to make it happy for my little one, but fortunately he was very excited after seeing it, so it was worth it. This is made with chiffon rolls, and other rolls can be made as well. I feel that making these shapes mainly requires carefulness and patience. Cake rolls are not difficult, but the parts require more effort.
Tags
Ingredients
Steps
-
Make the cake roll first. The ingredients for the cake roll: 80G low-gluten flour, 4 eggs, 45G salad oil, 45G milk, and 60G fine sugar. Separate the egg yolk and protein and put them into different egg beating basins respectively. Put 20G fine sugar in the egg yolk basin and beat well with a manual egg beater

-
Add milk and salad oil and continue beating until the oil and water are mixed

-
Sift in the low-gluten flour and continue to mix

-
Beat the egg whites into 40G of fine granulated sugar, beat with an electric egg beater until wet peaks form, and gently lift the egg beater to form a curved angle. After beating, open the oven and preheat it to 140 degrees

-
Use a rubber spatula to scoop a spoonful of the beaten meringue into the egg yolk bowl, stir evenly from the bottom up, then pour it into the meringue bowl, and continue to stir evenly

-
Place on a baking sheet lined with greaseproof paper and gently tap the baking sheet on the countertop to release large air bubbles. Then put it in the middle rack of the oven and bake for 30-35 minutes

-
Take out the baked cake, peel off the parchment paper around it, let it sit for two minutes, turn it upside down on the baking grid, peel off the parchment paper, cover it with a new piece of parchment paper and let it cool to prevent the surface from drying out

-
Turn the dried cake over and roll it up with the help of a rolling pin (the rolling technique is pictured in the cake roll I posted before). Wrap both ends and refrigerate for half an hour to set

-
After taking out the cake roll, cut off both ends, and then work it into three pieces, as shown on the right side of the picture. The far right is the face, the middle is the brim, and the third piece is the hat. The face needs to be cut diagonally, just a little diagonally, otherwise it will not stand firmly, and the angle with the table is about 80 degrees

-
Place the brim on the hat so that it can come out a little toward the face

-
Heat the pink chocolate over water until it melts and melts into a flowable chocolate syrup. If it is too thick, add a few drops of water

-
Place the whole hat on the baking grid, put a plate underneath, and pour the melted chocolate syrup on top. When pouring, you can let it cool for a while and then pour it when it is thicker. You can use a spoon to do it

-
Take a piece of fondant and roll it into a piece and cut it into a cross. You can draw a paper template yourself for reference

-
Use a suitable nozzle to press out the whites of your eyes

-
After softening 10G butter, add flour and knead it into a ball. Then add cocoa powder and knead it into a smooth dough. If it is too hard, add a little water. There must not be too much water

-
Roll out the cocoa dough into a sheet, and cut the paper mold in advance. Use the paper mold as a guide to cut the dough into the shape of the paper mold

-
Then flatten the sides, put it into the middle rack of the oven covered with oilcloth, and bake at 180 degrees for 10 minutes, take it out and let it cool for later use

-
This step is to assemble the parts. Just apply a little honey on the cross fondant and the whites of the eyes. After the chocolate pen melts, draw the eyes and mouth. Poke a small hole on both sides of the hat and insert the freshly baked cookie decorations.
