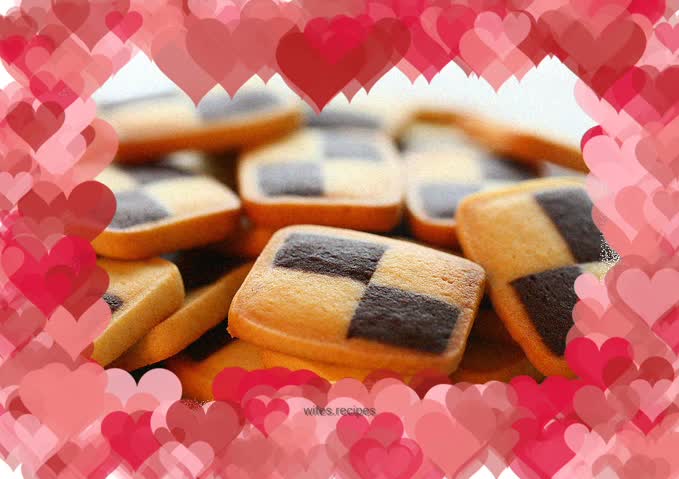
Small checkerboard cookies
Overview
Speaking of checkerboard cookies, it’s actually not difficult, you just need to stagger two colors of dough. It's just that the steps of rolling the dough into the same thickness and size, covering it, then refrigerating it, then cutting it into strips, then folding it, then freezing it, and then slicing it sounds like a huge undertaking. Once you get tired of eating one cookie flavor, you will definitely try your best to make the cookie taste richer. For example, a combination of original flavor and cocoa flavor, or changing to matcha, coffee, strawberry powder and other flavors. Not to mention, food with beautiful colors always makes people happy and makes them eat more.
Tags
Ingredients
Steps
-
Vanilla dough ingredients: butter: 160g, powdered sugar: 120g, egg: 1, vanilla extract 3g, low-gluten flour: 300g

-
Chocolate dough ingredients: butter: 80g, powdered sugar: 60g, eggs: 25g, vanilla extract: 3 drops, cake flour: 130g, cocoa powder: 20g

-
Preparation 1. Make vanilla dough first, beat naturally softened butter and powdered sugar together and beat evenly, no need to beat

-
Add the beaten eggs and continue to beat evenly

-
Continue to add vanilla extract and beat evenly

-
Sift in the low-gluten flour in batches and mix with a silicone spatula

-
Knead the dough evenly with your hands, wrap it in plastic wrap and let it sit for a while

-
Next make the chocolate dough. Beat the naturally softened butter and powdered sugar together evenly. No need to beat

-
Add the beaten eggs and continue to beat evenly

-
8.Continue to add vanilla extract and beat evenly

-
Sift in the low-gluten flour and cocoa powder in batches, and mix with a silicone spatula first

-
Knead the dough evenly with your hands, wrap it in plastic wrap and let it sit for a while

-
At this time, take half of the vanilla dough and roll it into a rectangle about 1 cm thick (the other half of the vanilla dough is used for wrapping)

-
Then roll the chocolate dough into a rectangle of the same size and about 1 cm thick

-
At this time, take half of the vanilla dough and roll it into a rectangle about 1 cm thick (the other half of the vanilla dough is used for wrapping)

-
Place the chocolate dough sheet on top of the vanilla dough sheet brushed with egg wash, press it slightly to make it stick together tightly, then place it in the freezer for half an hour until it becomes hard enough to be cut

-
Take it out after freezing and cut into long and even strips

-
Brush a long cross-section with egg wash as an adhesive

-
Place the cross-section of another long strip on the long strip brushed with egg wash. The black top side should face the yellow side below, and the yellow side above should face the black side below. The colors should be staggered

-
Place a layer of plastic wrap on the table, place an appropriate amount of the remaining vanilla dough in the middle, flatten it slightly, then cover with a layer of plastic wrap, and use a rolling pin to roll it into a rectangular shape

-
Roll out and tear off the plastic wrap on top, brush with a layer of egg wash (in addition to the recipe amount), and place the two pasted sides in the middle of the rectangular dough brushed with egg wash

-
Wrap the dough, remove excess dough, and put it in the refrigerator for about 30 minutes until the dough is frozen enough to be cut

-
Take out the frozen dough and cut it into 0.5cm thick pieces with a knife

-
Cut the cookies into spaced apart pieces and place them on a baking sheet lined with greaseproof paper. Place them in a preheated oven at 180 degrees Celsius. Bake for about 12 minutes until the edges of the cookies turn golden brown. Take them out of the oven. Eat after cooling and store in a sealed container

-
Done

-
..

-
...
