Decorated cake: fancy
Overview
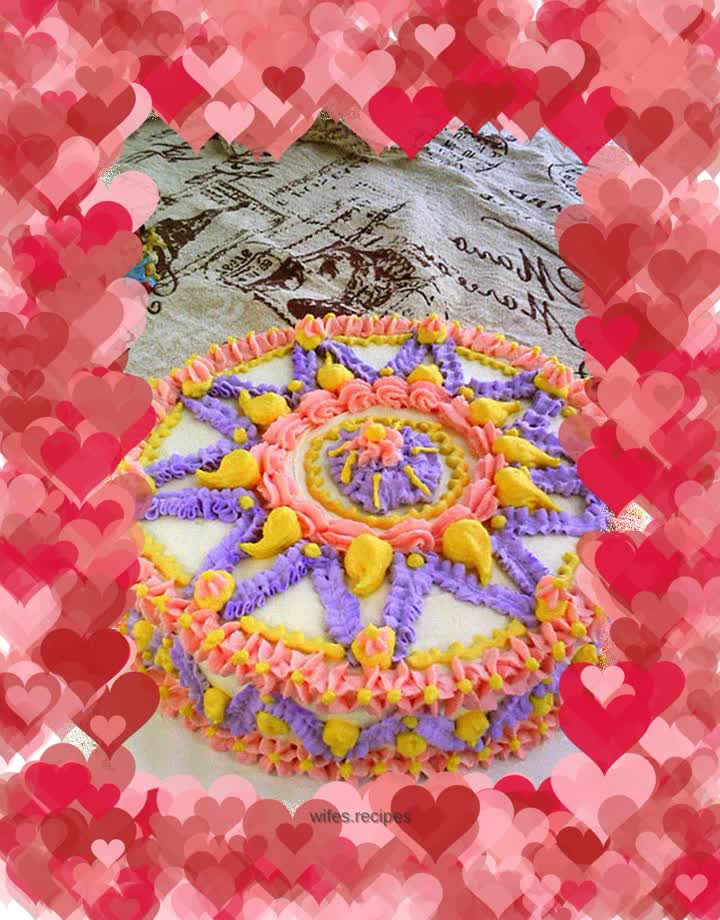
This cake is so fancy. Isn't it for women? Women have to spend a little more. Pure quibble. There was no clear idea from beginning to end, let alone a conception, and I just made a cake out of nowhere. It should be for birthdays. I really don’t know what a cake for a woman should look like. It seems that most women like pink and purple, so just choose these two colors. I randomly made three circles with pink, but the shell got stuck. What should I do next? Enter purple. Make a circle around the waves and build a small hill. It seems like you can build a spire on it? What then? Let's also add a circle of waves on the outside. Think of it as light or petals, just to fill in the blanks. Looking at it this way, it seems like it can be finished, but it seems a little too thin, and the two colors are too stark. How about some more yellow? Otherwise, what are you going to do with a lot of cream left? You can do whatever you want, and you don’t need any fancy tips. Just cut a small slit in the piping bag, and then coil the balls and add them wherever you can. The whipped cream is almost there, and the cake is also very fancy, with not much left to add. The layers are unclear, the focus is unclear, and it’s just make-do. . .
Tags
Ingredients
Steps
-
Take out the chiffon cake and set aside

-
Butter and utensils

-
Smooth the top of the cake, cut it into two pieces crosswise, clean off the cake crumbs, and set aside

-
Pour the caster sugar into the cream

-
Beat until the pattern can be maintained

-
Take a piece of cake and spread the filling cream

-
Place another piece of cake, take an appropriate amount of cream, and spread it

-
Smooth the top and sides

-
Red cream

-
Use a star-toothed nozzle to squeeze a star shape on the bottom and top circles

-
Squeeze a circle of shell pattern in the center of the top surface

-
Adjust purple cream

-
Use a leaf-shaped nozzle to extrude wavy patterns on the side

-
A small hill-like pattern is extruded in the center in a spiral pattern, and a petal-like pattern is extruded on the periphery of the shell pattern

-
The top of the hill is decorated with pink stars

-
Adjust yellow cream

-
Use a thin pasting bag to decorate around the central hillock and the top

-
On the inside of the top edge, use yellow to squeeze a spiral pattern

-
In the blank space outside the shell pattern, tadpole-like shapes are squeezed out

-
Small yellow balls squeeze out from the turning point of the side waves

-
Small yellow balls are squeezed out from the tips of the purple patterns on the top,

-
Dot yellow dots in the center of the stars in the upper and lower circles, and dots on the turning points of the purple waves

-
Put yellow dots on the purple pattern between the yellow tadpoles

-
A pink star is squeezed onto the yellow ball on the top periphery

-
And put yellow dots on the stars

-
Complete
