Braised Pork with Salted Vegetables
Overview
After the New Year, I am super busy every day. My brain seems not enough, so this year I suddenly feel that my brain is not working well. My memory is very poor, and sometimes I am confused when doing things. For example, last time my family bought two bags of salted vegetables to make braised pork, but they were not used. Later, I wanted to buy seven bags of peppers, but they were all salted vegetables. When I got home, I thought the seller sent the wrong one, but I didn’t know that I had taken the wrong one. So you know that you have to consume it after you buy it. I went to the supermarket a few days ago and happened to see this piece of meat that was pretty good, so I decided to buy some fertilizer. I’ve been working on it today
Tags
Ingredients
Steps
-
Prepare a square piece of fat and thin pork belly. The square shape is good for slicing and the fat and thin parts are not too greasy to eat. Use an eyebrow razor to shave off the hair on the skin. I used an eyebrow trimming knife. Pour an appropriate amount of cold water into the pot, add scallions, ginger slices, and some household spices: cinnamon, star anise, bay leaves, and a few peppercorns. Boil for seven or eight minutes and set aside for later use

-
If you are using molded dried vegetables, you need to soak them one night in advance. I use wet salted vegetables, so it’s okay if you don’t need to soak them. I bought them online. After opening the package, you need to wash these with warm water several times because the salted vegetables are washed away with salt and squeezed dry with your hands

-
Cut into finely chopped pieces

-
Now start to poke holes in the meat skin. If you have a toothpick at home, a toothpick will do. You need to make holes on the entire meat skin

-
Now let’s start coloring. Find a larger flat plate and pour an appropriate amount of dark soy sauce

-
Apply it evenly around the meat with your hands, be sure to spread it evenly

-
Place the meat skin side down on a plate with dark soy sauce and soak for ten minutes

-
After soaking, drain the soy sauce. If you are pressed for time, soak it with kitchen paper because if there is water when frying, it will fry and you may get burned if you are not careful

-
Put a little oil in the pan, just enough to cover the skin. Heat it up. Then put the meat pieces with the skin side down. After a few seconds, use a spatula to move it to prevent the skin from sticking to the pan. You can cover the pan for fear of oil splashing. Generally, move the spatula for more than a minute to see how it is frying. Take it out when the skin is golden.

-
Mince the garlic and ginger, mince the white part of the onion

-
Heat the remaining oil for frying the meat over low heat, add the garlic and ginger paste and sauté until fragrant

-
I personally think it tastes a little spicier, so I added dried chili peppers and stir-fried them together

-
Add salted vegetables, stir-fry evenly, and a spoonful of cooking wine

-
Stir-fry for about three minutes and add an appropriate amount of chicken powder. Add a little sugar and take it out of the pan. You can taste it here to see if you need to add salt

-
Pour the dark soy sauce that has just been rubbed onto the meat into a small bowl, add a little sugar, light soy sauce, beer, and white pepper and mix well

-
After the fried meat is cooled, cut it into even slices. In fact, I think it is more delicious if it is thicker

-
Spread the sauce you just prepared on each slice of meat evenly

-
Place the rubbed meat, skin side down, evenly next to each other on the bottom of the large bowl to be steamed

-
A portion of the chopped meat is placed on top of the piled meat and placed around

-
Pour the fried salted vegetables into the bowl and stuff it all around the bowl, and press it tightly with a spoon

-
I use an ordinary pot and steam it with water. It takes about an hour and a half. If you use a pressure cooker, it will take about 40 minutes. [You can also make a few more portions at a time. Take them out and let them cool. Do not turn them upside down. Refrigerate them. Take them out directly when eating and steam them.]

-
Take out the steamed meat, put a bowl directly on top, turn it over, and then use chopsticks to slightly arrange the shape. Be careful to burn it and your hands will be slippery. I almost failed

-
There will be soup in the steamed meat bowl. Pour it into a small bowl. This is also an essential step for making this dish delicious

-
Pour the soup into the pot, heat it up, and add the water starch prepared in advance to thicken

-
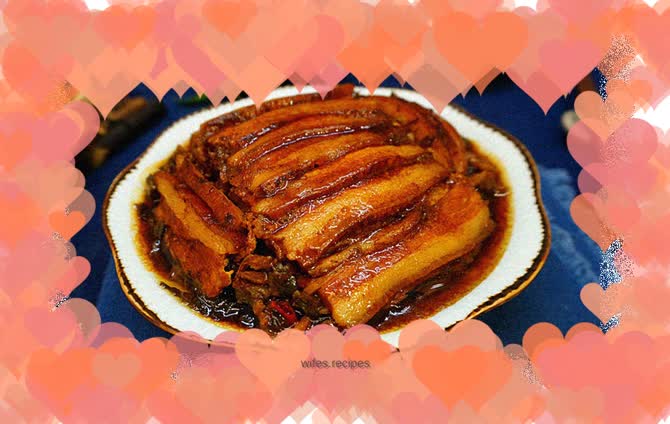
The thickened soup is poured evenly on top of the meat. Wow, it looks so good that you don’t want it anymore. It’s no exaggeration to say that my mouth is watering

-
In fact, I personally think that the meat will taste better if you continue to steam it for the second meal before finishing the first meal. This dish is inherently better the more it is cooked

-
Do useful things, say brave things, think good things, sleep well, and spend your time making progress instead of complaining. May you meet such a person, may you become such a person.
