Homemade three-color facelift
Overview
This is my first time trying to make homemade cold skin. I thought it would be a difficult task, but it can be easily done by using your brain and hands. Three-color facelift is made by adding natural color juice to the batter obtained by washing the face. It is quickly steamed and cooled into cold skin. The method is simple, easy to operate, clean and hygienic, and has a chewy texture.
Tags
Ingredients
Steps
-
Prepare 1 pound of high-gluten flour, 5g of salt, and half a pound of water.

-
Stir the dough into a fluffy consistency.

-
Knead until smooth dough forms and let rest for half an hour.

-
The dough has rested for half an hour.

-
Start washing the dough and add appropriate amount of water to the dough.

-
Put the washed milky white batter into another basin.

-
Add water for the second time and continue washing your face.

-
Pour the washed batter into the basin.

-
Wash your face for the third time (3 times in total).

-
Put the batter washed out three times into a basin and let it sit for at least 8 hours (the weather is a bit hot, so I put it in the refrigerator).

-
I have already poured out a portion of the batter that has rested, and let it settle before pouring out the settled water.

-
The batter obtained after precipitation is white, delicate and very thick.

-
Cut the cherry tomatoes into cubes beforehand.

-
Place in a food processor and add a little water.

-
Whipped tomato juice.

-
Filtered tomato juice.

-
Add a little less water to one bowl of puree juice, and add tomato juice to another bowl and mix thoroughly.

-
Add an appropriate amount of barley powder to the batter.

-
Mix the green juice thoroughly first and then add it to the white batter and stir evenly.

-
Boil the water in the pot, brush the mold with thin oil, add an appropriate amount of white batter, put it in the pot and steam with the lid on for 1 to 2 minutes.

-
When the Liangpi is soaked, take out cold water.

-
After making the first piece of cold skin (this is my first time making cold skin, it feels pretty good), brush it with a thin layer of cooking oil.

-
The method for pink tomato cold skin is the same as above (you need to wash the plate after steaming one mold and taking it out, dry it and then brush it with a thin layer of oil before making the next one).

-
Green Liangpi can be deduced in the same way.

-
Part of the prepared cold skin (brush each layer with a thin layer of cooking oil).

-
Cut the white cold skin into strips.

-
Cut pink tomatoes into strips.

-
Cut the green cold skin into strips.

-
Wash the Chinese toon seedlings and use for garnishing.

-
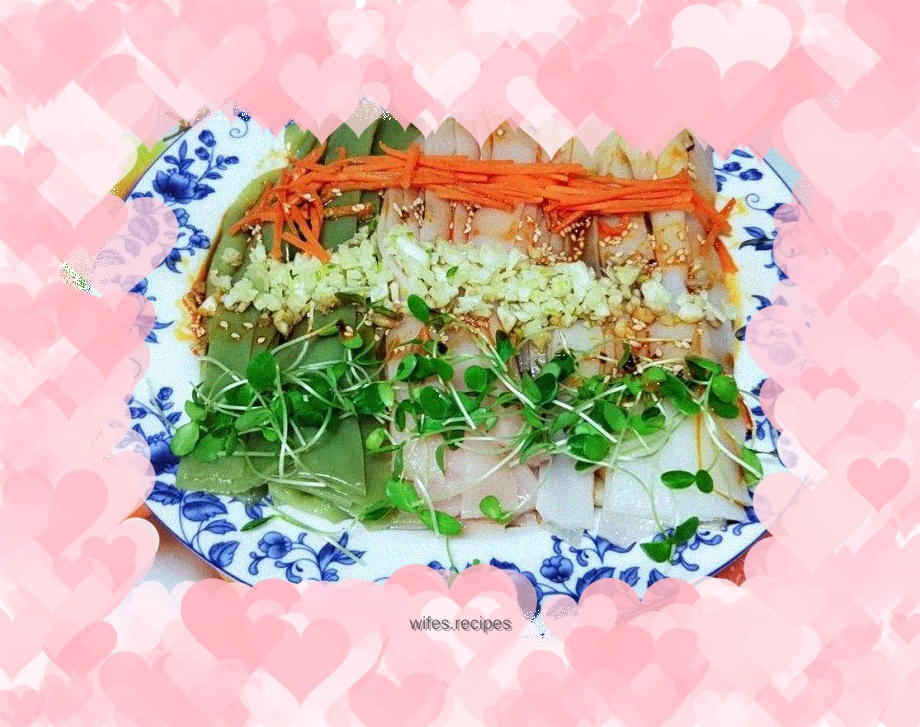
Put the three-color cold skin into a plate. There are no additives in the three-color cold skin and you can eat it with confidence.

-
The color is distinct, and the color of the batter does not need to be too dark, because the finished product will naturally become darker after it is cooked (but you can feel free to like darker colors).

-
Prepare a bowl of sauce.

-
Garnish the cold skin with minced garlic, Chinese toon sprouts and shredded carrots.

-
Pour in the sauce and the finished cold skin will be beautiful in color, cool and smooth, and have a chewy texture.
